While working with plates, we often perform operations that require filtering.
If we scale up images, Nuke has to come up with new pixels to fill up the bigger resolution. If we translate or rotate images to a point where a pixel is not simply mapped to a new pixel but rather in between, filtering is needed.
Now let’s say we need to know what kind of filtering our image went through, so that we can treat areas that might have gotten too soft or we simply want to re-grain them.
The only thing we have to do is to create a checkerboard node and we make sure that the format matches our plate format.
We set it the resolution knob to 1 – so every single square matches the size of one pixel.
Set all the squares to pure black and white – set the line width to 0.
With the help of a Copy node, we integrate it into the B pipe of our plate – BEFORE the filtration treatment.
The red channel is enough and we create a new layer for this called filtration.
Then, we copy the inverted checkerboard into the green channel of our filtration layer.
When we apply transformations they will not only affect the RGBA channels but rather all of them. By piggybacking our filtration layer through our B-pipe, it will get transformed the same way.
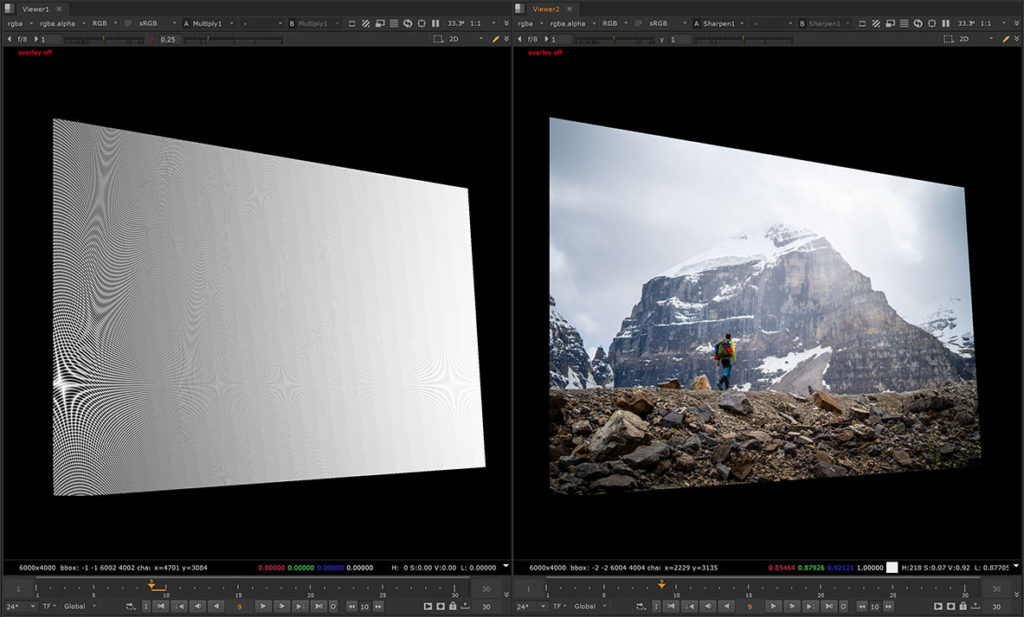
After we’ve applied all transformations, we simply shuffle out the red and green channels of our filtration mask and merge them with a ‘min’ operation.
The ‘min’ operation looks at both inputs, A and B – for every pixel and outputs the input the input with the darkest pixel.
Since we inverted the checkerboard for the green channel, they cancel each other out and we end up with black (if no transformations are applied).
When we perform filter operations though, the edges of our squares break up because of the black and white values blend into another.
We will get values of white wherever filtering happens, since the squares are not lining up perfectly anymore.
The pixel blending let’s our white values sit at 0.5, so we will use a Multiply node set to a value of 2 to increase our maximum values to 1.
You can download this setup as a Nuke script here: Filtration Mask